
The Tools I Use to Run My Travel Blog
Wondering what it takes to run a professional travel blog?
I make a full-time income from running multiple niche websites and blogs, including Wander Her Way.
I absolutely love being a travel blogger, and it’s an amazing feeling to be able to earn money writing about a topic that I’m passionate about.
And the great thing about blogging is that the costs of starting and running your business are pretty low. Although it is worth investing in resources and tools to manage your blog, there are also a lot of great stuff out there that you can get for free.
Here’s a look at all the tools (free and paid) I use to run my travel blog.
Web Hosting
Bluehost: I personally use and recommend Bluehost for all new bloggers. I run multiple blogs through Bluehost and have never had any issues with them. Their customer service is great, and they have helped me out many times (including twice when I literally broke/deleted my website.)
Web hosting is something you need if you want to start a professional travel blog.
Bluehost also has some of the most affordable web hosting plans out there. One year of hosting costs around $120 and you can save even more if you sign up for the 36-month term.
When you start your blog with Bluehost, they will provide your .com domain name for FREE for the first year (a $15-$20 value.)
You can follow my step-by-step guide to starting a travel blog, which contains detailed instructions on how to set up your blog using Bluehost (it’s extremely easy, I promise!).
WordPress Theme
Update: Find out why I changed my WordPress theme to Kandence.
17th Avenue Designs: I purchased a WordPress theme from 17th Avenue Designs and I love the way it looks! I am using their Vivienne Theme, which is a popular choice. I have discovered quite a few other bloggers that use this same theme, and it’s a great option for travel bloggers.
Some of my other favorite WordPress theme designers are:
- Restored 316
- BizBudding (former Pretty Darn Cute)
- Hello You Designs
I have worked with all of these theme designers before and they have great options for travel bloggers! Especially if you are looking for a pretty, feminine WordPress theme.
Premium WordPress themes aren’t too expensive. They typically cost between $50 to $75 and are worth every penny.
While purchasing a premium WordPress theme for your travel blog is not an absolute must, I highly recommend you do.
Having a premium theme gives you access to more customization options compared to a free theme, along with customer support in case you have any questions. It also looks a lot more professional compared to a free theme.
Keyword Research
Any pro blogger will tell you that blogging starts with keyword research. Without it, your posts might be invisible to search engines and chances are no one will ever read them.
Semrush: I use several tools to conduct keyword research and keep an eye on the competition but Semrush is by far my favorite. It’s a powerful toolset that comes with a high price tag, but if you plan your content right, you can sign up for a month or two at a time.
You can sign up for a FREE trial with Semrush. Give it a try!
If you are new to SEO, check out the Semrush Academy. It is a fantastic resource for new and experienced bloggers.
Email Marketing
An email list is not required to be a successful blogger, but I highly recommend it.
Email is a direct channel to communicate with your most engaged audience, so the sooner you start building your list, the better!
I use or have used ConvertKit, Flodesk, ActiveCampaign, and MailChimp on my blogs or at my previous jobs (you do know I am a recovering marketer, right?)
ConvertKit: One of the leading email marketing platforms out there, ConvertKit offers a free plan for up to 1,000 subscribers. Beyond that, you’ll have to upgrade to the Creator Plan, which starts at$29 per month. If you choose the annual plan, they will give you two months free.
MailChimp: MailChimp is 100% free for up to 2,000 subscribers. The next level up is priced at $30.99 for up to 2,500 subscribers, but if you exceed 2,000 subscribers in the free plan, you can buy credits and join the Pay-As-You-Go plan as an alternative. This is a good option if you’re still building your email list and not sending a lot of emails.
While MailChimp has more design flexibility, more advanced features (if you’re into that), and more free contacts, I recommend ConvertKit if you’re new to email marketing. It’s a little easier to manage your email list and get started.
Pinterest is the ONLY form of social media I use to promote Wander Her Way. Crazy, I know. I tried out other platforms like Instagram, Facebook, and Twitter for my blog, and none of them offered the same return on investment that Pinterest provides.
I spent hours on those three platforms attempting to drive traffic to my blog with very little success.
Compare that to Pinterest, where I spend a few minutes a day and drive 20,000+ page views to my blog every month. It’s definitely a platform all travel bloggers should focus on more.
Here are the Pinterest tools I use:
Tailwind: Tailwind is a Pinterest scheduling tool that allows you to create and schedule pins in bulk.
Canva: Canva is a FREE graphic design program that I use to create my Pinterest images.
Images with text overlay do a lot better on Pinterest and get more clicks than plain photos do.
For an example of what I mean, check out my Wander Her Way blog board on Pinterest. I create a variety of Pinterest images for each of my blog posts using Canva.
Pinterest Templates: While I am technically a graphic designer, I prefer to spend my time doing things that drive more traffic to my blogs.
So I love using Pinterest templates from Creative Market. They are editable with Canva and designed specifically with travel bloggers in mind (and created by another travel blogger!).
I have been able to quickly create hundreds of gorgeous Pinterest images for my blog posts using these templates.
Facebook Groups
There are many awesome Facebook groups out there specifically for travel bloggers. These are really helpful, especially when you are first starting out. Some groups aim to help you grow your blog, while others exist for support and collaboration opportunities.
Here are my favorite groups for travel bloggers:
- Travel Collab Post Opportunities
- Female Travel Bloggers
- Travel Blogger Link Swap Group
- Link Building + Guest Posts + Collab
- Travel Bloggers Club
- Pinterest Travel Bloggers Club
- Wandering Women Travel Bloggers
Note: Facebook groups can be helpful, but they can also be a huge waste of time if you aren’t careful. I try not to spend more than a few minutes a day aimlessly scrolling through groups.
Courses
Online courses can be extremely helpful for travel bloggers. I have taken quite a few online courses that have helped me increase my earnings from my blog.
Travel Blog Prosperity: So much more than an online course! Travel Blog Prosperity is also a membership group for travel bloggers created by Jessie from Jessie on a Journey.
Promo Code: Use code WANDER9 and get the first month of Travel Blog Prosperity for only $9!
As a member, you get access to 30+ courses, as well as live coaching calls with Jessie, a weekly VIP Opportunities Newsletter, and a private Member’s Lounge group where you can get answers to all your blogging questions.
How to Start a Travel Blog
Are you ready to start your own travel blog? Here’s a quick step-by-step guide on how to get started!
These are the exact steps I took to start Wander Her Way. You can follow this tutorial and have your own travel blog up and running in less than one hour!
Step 1: Choose a domain name
The first step to starting a travel blog is choosing a name for it. Your blog name will be the first impression that you have on people, so it’s important to pick a good one!
If you need some help coming up with a name for your blog, be sure to read this guide: Travel Blog Names: How to Choose One + Ideas.
Step 2: Get hosting
Once you have chosen a name for your travel blog, you will need to register it and get web hosting.
If you buy your domain name through an outside company, you can expect to pay $15 to $20 for it. However, if you sign up for web hosting through Bluehost, you can get your domain name for free.
I highly recommend Bluehost for web hosting, and they are the company I (and many other bloggers) use. They have some of the cheapest hosting plans out there, while still having an extremely reliable service and great customer support.
Here are the detailed steps to set up web hosting with Bluehost:
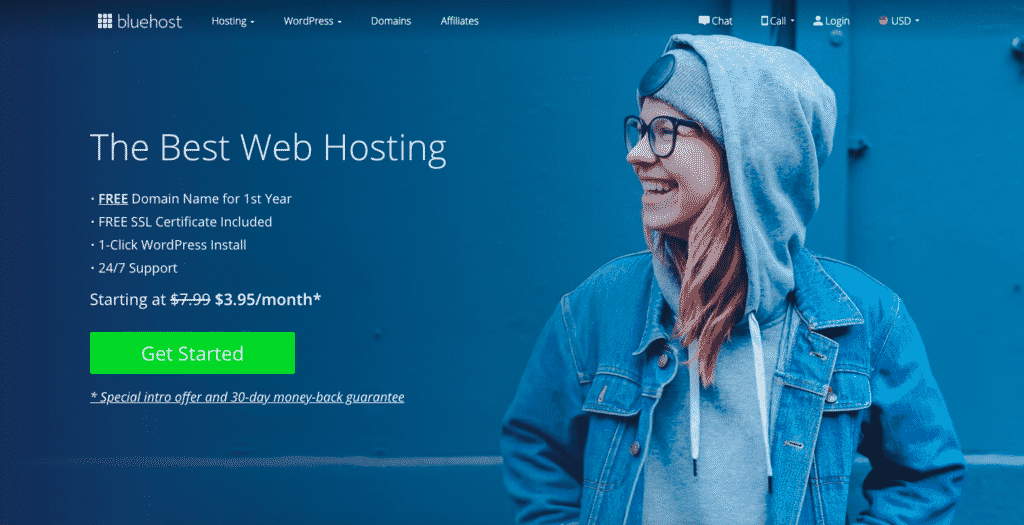
1. Click the “Get Started” button
2. Select your hosting plan
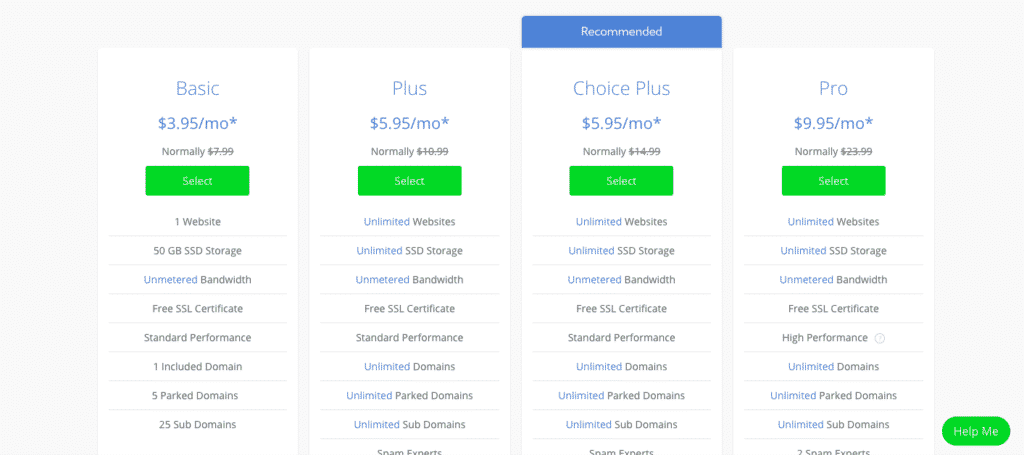
Which plan to choose: I recommend the basic plan for new bloggers.
I’m personally on the plus plan, but that’s only because I run multiple blogs. Otherwise, I would probably choose the basic plan!
3. Put in your domain name
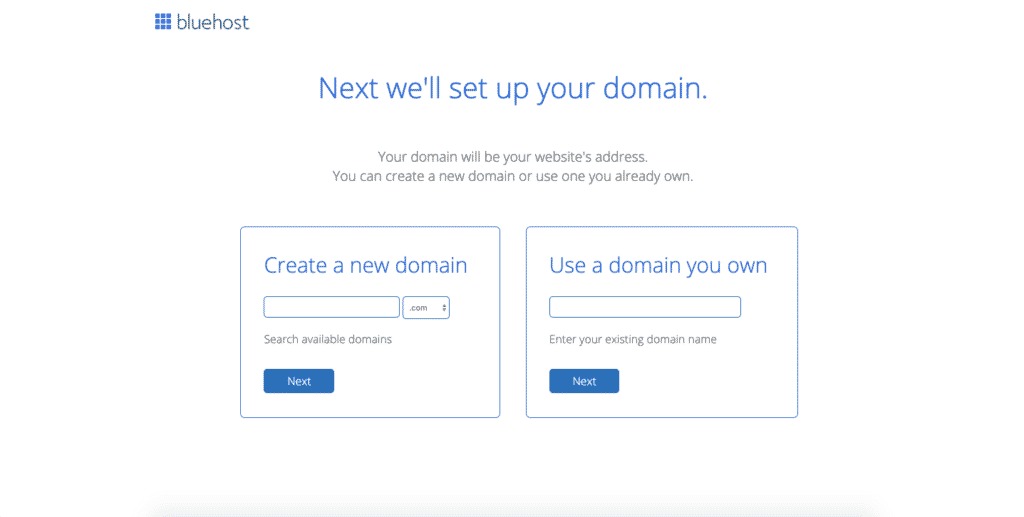
This is where you’ll put in the domain name that you decided on earlier.
What if I haven’t decided on a name yet? If you haven’t decided on a domain name for your travel blog yet, wait a couple minutes and this offer will pop up on your page:
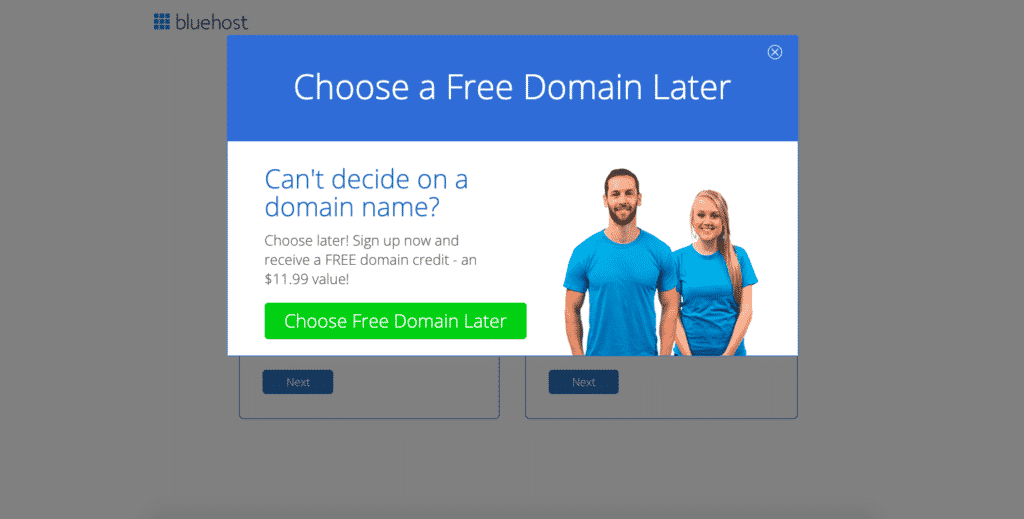
Select this option and you can go ahead and start setting your blog up, then use the free credit to buy your domain name later.
4. Create your account
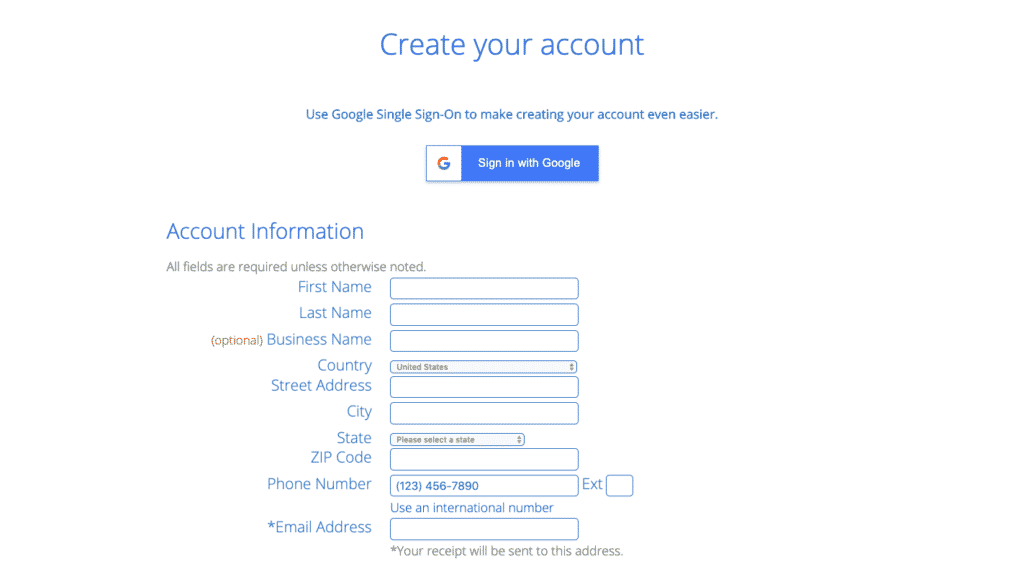
5. Select your package and pay
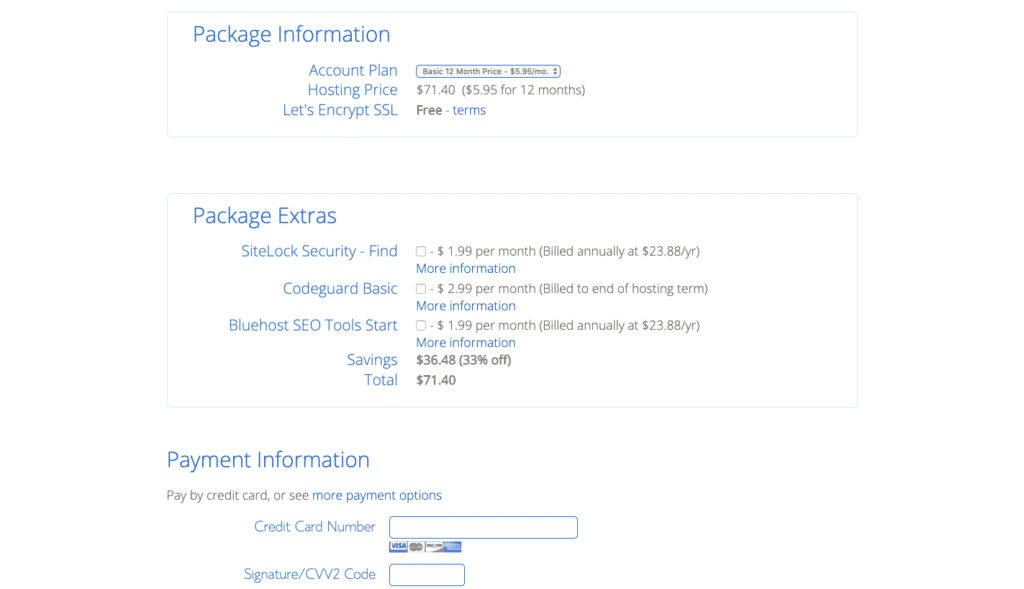
Here’s where you’ll select your hosting plan. The 36-month plan is the best deal at $3.95 a month, but you can also pick a 12-month plan at $5.95 a month for an overall lower cost.
What about package extras? You have the options to add on extras like site backups or site security.
I personally don’t recommend any of these, because there are free WordPress plugins you can install that do the same thing (which I’ll cover in the next section of this guide.)
6. Congrats, you’re done!
Once you check out, you’ll be redirected to your Bluehost dashboard. This is where you can log in to your blog for the first time and start setting everything up.
Your blog will be run on the WordPress platform. Bluehost installs WordPress automatically for you, so you don’t have to do anything on your end.
Step 3: Designing your blog
Your blog will come with the default WordPress theme installed. You will definitely want to change this, which means it’s time to pick a theme for your blog!
When it comes to designing your blog, you have a couple of options. You can hire a web designer, or you can install a theme on your own.
I recommend installing a theme on your own because it’s MUCH cheaper and easier.
There are plenty of free themes out there, but I don’t recommend them because they look very plain, don’t have many customization options, and don’t include customer support.
A premium theme is a much better investment and will make your blog stand out from the crowd.
If you need help finding the perfect theme for your travel blog, make sure to check out my list of the 5 Best WordPress Themes for Travel Blogs.
Step 4: Install plugins
WordPress plugins add extra functionality to your blog. There are thousands of plugins out there, but the ones I recommend most for new bloggers are:
- Yoast SEO: Yoast helps you write blog posts that are SEO-friendly. SEO, or search engine optimization, is what gets your blog posts ranked in Google. Yoast will tell you exactly what you need to do for each blog post you write to improve your SEO.
- Akismet: This plug-in filters out spam comments on your blog.
- WordFence Security: Great security plug-in to protect your site.
- MonsterInsights: MonsterInsights lets you view analytics like page views and your most popular posts. You will need to install Google Analytics on your blog first.
- UpdraftPlus: This plug-in makes regular backups of your site so you never lose anything!
- Social Warfare: Add social sharing icons to your blog posts.
All of these plug-ins are 100% free to use.
Step 5: Start posting!
By now, you should have purchased a domain name and hosting through Bluehost, installed a WordPress theme (these are my favorites), and customized your blog with plug-ins.
Now all that’s left is to start posting – and that’s where these travel blog post ideas will come in handy if you need some inspiration on what to write about. 🙂
Other Resources for Travel Bloggers

About Denise Cruz
Denise is a marketing executive who escaped corporate to travel the world… twice. A Brazilian native living in the U.S., she’s lived in 4 countries and visited 35+ others. After side-hustling her way to financial independence, she curates solo destination guides, slow travel tips, and travel blogging advice on Wander Her Way. When she’s not on the road, you can find her in Miami with her dog Finnegan.